

Introduction to the Enchanting World of Ciambella
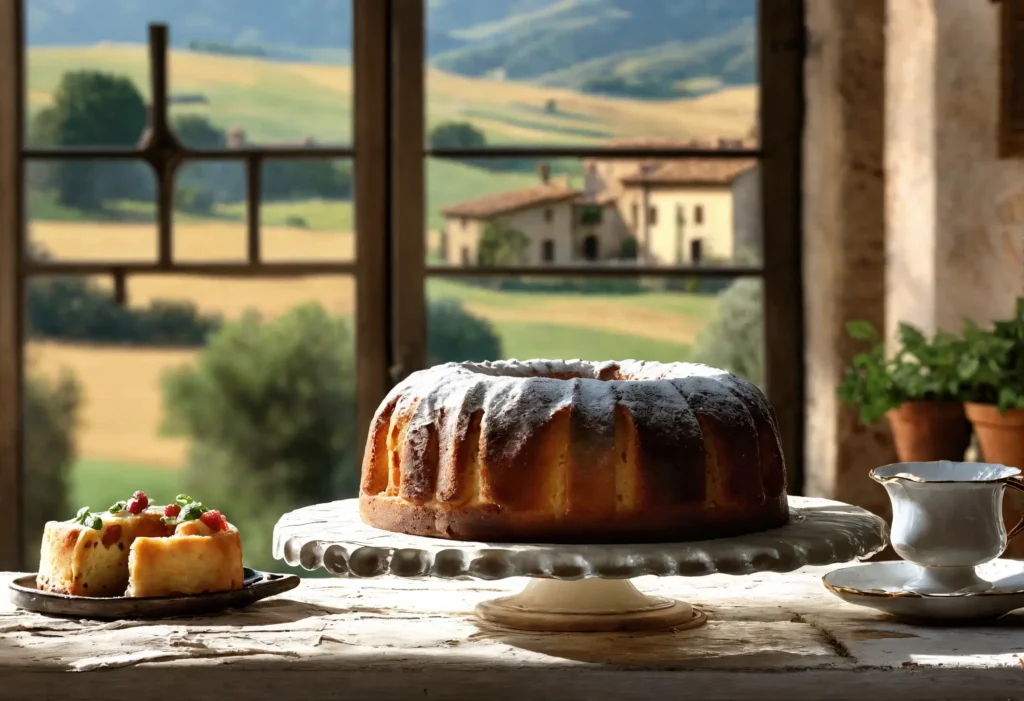
Embark on a delightful journey into the heart of Italian cuisine with Ciambella, a sweet Italian ring cake that’s more than just a dessert. It’s a voyage through Italy’s rich culinary history, embodying the country’s love for simple, yet profoundly satisfying desserts. As we explore the roots of Ciambella, its evolution, and guide you in crafting your own, you’ll discover that whether you’re a seasoned baker or a curious novice, this journey is set to whisk you away into the delicious world of this Italian breakfast cake. Indeed, every slice tells a story of family, tradition, and the simple joys of life.
Discovering Ciambella
Introduction to Italian Ring Cake
It isn’t just any dessert; it’s a slice of history on a plate. Originating from the picturesque landscapes of Italy, this sweet bread ring has graced breakfast tables and gatherings with its simple elegance and comforting flavors. But what truly makes Ciambella special? It’s the cake’s humble beginnings, its transformation across regions, and its remarkable ability to bring people together, solidifying its place as a beloved staple in Italian cuisine.
Historical Roots and Cultural Significance
The journey of Ciambella starts in the rustic kitchens of Italy, where simple ingredients were transformed into this sweet marvel. Each region added its own twist, infusing local flavors and traditions into the batter. From the zest of Amalfi lemons to the rich cocoa of Piedmont, Ciambella became a canvas for Italy’s culinary diversity. Furthermore, the ring shape of Ciambella carries with it symbolism of unity and wholeness, making it a favorite for celebrations and family gatherings, and embodying the Italian ethos of coming together to share joy and celebrate life’s simple pleasures.
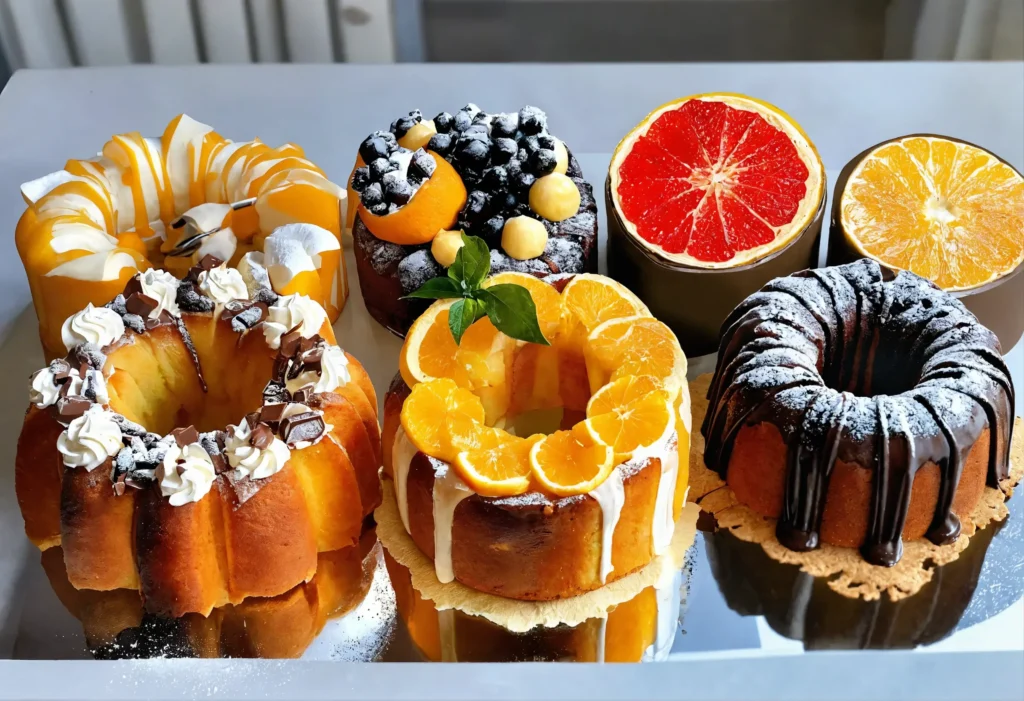
Modern-Day Delight: Varieties Across the Boot
Fast forward to today, and Ciambella has evolved into an array of delectable variations. No longer just a simple sweet bread, it now boasts flavors as diverse as Italy itself. From the citrus-infused Ciambella al Limone to the decadent Ciambella al Cioccolato, there’s a version for every palate. Moreover, for those with dietary restrictions, gluten-free and vegan options abound, ensuring that everyone can enjoy a slice of this Italian delight.
Crafting the Perfect Ciambella
Essential Ingredients for a Traditional Italian Doughnut
Selecting the right ingredients is crucial when baking Ciambella. Flour, eggs, sugar, and leavening agents form the backbone of this beloved cake. Firstly, choosing high-quality flour can make all the difference, providing the structure and softness that Ciambella is known for. Additionally, eggs add richness and color, while sugar sweetens the deal. Importantly, a leavening agent, such as baking powder, ensures the cake rises beautifully.
Selecting the Ideal Flour Type
For a flawless Ciambella, the type of flour is key. Typically, all-purpose flour works well, offering the perfect balance of gluten. This ensures the cake is soft yet structured. Moreover, for a lighter texture, some bakers blend cake flour into the mix. This small adjustment can elevate your Ciambella to new heights of deliciousness.
The Crucial Role of Eggs and Sweeteners
Eggs are indispensable in Ciambella, enriching the batter with moisture and fat. This results in a tender crumb that’s irresistibly soft. Sugar, on the other hand, not only sweetens but also contributes to the golden crust. For a nuanced flavor, consider adding a hint of vanilla or almond extract. These subtle touches can transform your Ciambella into a masterpiece of taste.
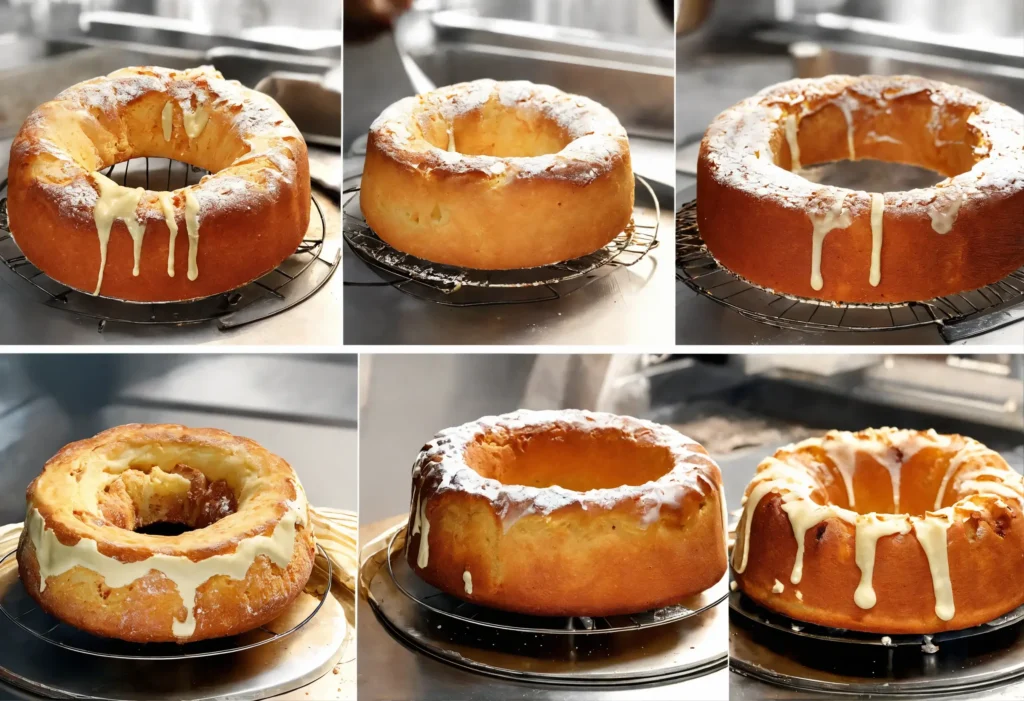
Comprehensive Guide to Baking Ciambella
Baking the perfect Ciambella is an art that requires attention to detail. Begin by preheating your oven, a crucial step that ensures even baking. Next, cream together butter and sugar until light and fluffy, a process that introduces air into the batter. Gradually add eggs, one at a time, fully incorporating each before adding the next. This method guarantees a smooth, homogenous mixture.
Mixing the Perfect Batter
Once your wet ingredients are well combined, it’s time to gently fold in the dry ingredients. Alternate between adding flour and liquid, such as milk, to maintain a balanced batter. This technique prevents overmixing, preserving the cake’s tender texture. Finally, pour the batter into a greased ring pan, smoothing the top with a spatula.
Oven Tips for a Moist and Airy Italian Breakfast Cake
Bake your Ciambella in the preheated oven until a toothpick inserted into the center comes out clean. Remember, oven temperatures can vary, so keep an eye on your cake as it bakes. Once done, let it cool in the pan for a few minutes before transferring it to a wire rack. This patience pays off, yielding a Ciambella that’s moist, airy, and ready to enchant your taste buds.
Creative Takes on Ciambella
Flavorful Twists on the Classic Sweet Bread Ring
The versatility of Ciambella invites a world of creativity into the kitchen. By infusing this classic cake with new flavors, you can transform it into a dessert that’s uniquely yours, perfect for any occasion.
Citrus-infused Italian Ring Cake
Refreshing and Zesty
Adding the zest of a lemon or an orange to your Ciambella batter brings a refreshing citrus note, ideal for brightening up your dessert menu. A tablespoon of fresh juice can further enhance this effect, contributing to a moist and tender cake that’s irresistibly light.
Decadent Chocolate and Hazelnut Variations
Richness in Every Bite
For a richer take, cocoa powder and chopped hazelnuts introduce a decadent chocolate flavor and a satisfying crunch. Consider swirling in Nutella or sprinkling chocolate chips for an even more indulgent experience.
Adapting Ciambella for Every Diet
Gluten-Free and Vegan Ingredient Alternatives
Inclusive Baking
Adapting Ciambella for gluten-free or vegan diets is simpler than you might think. Gluten-free flour blends and plant-based substitutes like flax eggs or almond milk ensure that everyone can enjoy this delightful Italian cake.
Crafting a Gluten-Free Version
Using a mix of rice flour and almond meal can provide the perfect structure for a gluten-free Ciambella, maintaining the cake’s traditional texture and flavor.
Embracing Vegan Variations
For a vegan-friendly Ciambella, replacing eggs with applesauce or mashed bananas not only adds moisture but also binds the batter effectively, ensuring that the cake remains a joyous celebration of Italian baking traditions for all to enjoy.
Serving and Storage Insights
Elevating the Italian Breakfast Experience
Pairing with Coffee
Firstly, serving Ciambella with espresso or cappuccino can transform a simple breakfast into an authentic Italian experience. The robust flavors of coffee complement the cake’s sweetness, offering a perfect balance.
Creative Serving Suggestions
For an Afternoon Treat
Moreover, for an afternoon delight, consider toasting slices of Ciambella. Accompanying them with whipped cream or gelato not only adds a delightful contrast in textures but also elevates the overall taste. Additionally, a drizzle of honey or a dusting of powdered sugar can enhance the sweetness, making each bite even more enjoyable.
Short-Term Storage Tips
Keeping It Fresh
Furthermore, to keep Ciambella fresh for a few days, wrapping it tightly in plastic wrap or storing it in an airtight container is crucial. This method prevents air from drying out the cake, ensuring it remains moist. Also, storing it at room temperature is ideal for preserving the flavors, ready to be savored at any moment.
Freezing Techniques for Long-Term Preservation
Saving for Later
Lastly, for longer storage, freezing Ciambella is incredibly effective. Initially, slice the cake into individual portions, which allows for easy thawing of only the amount you plan to consume. Wrapping each slice in plastic wrap and then in aluminum foil protects it from freezer burn. When you’re ready to enjoy a slice, simply thaw it at room temperature or in the microwave for a quick warm-up, ensuring Ciambella is delicious even when it’s not freshly baked.
FAQs: Expert Tips and Common Queries About Ciambella
Can Ciambella be made in advance?
Planning Ahead
Absolutely, Ciambella is an excellent choice for those who like to prepare in advance. Once cooled, wrap it tightly to maintain its moisture and freshness. Stored at room temperature, it can be enjoyed for up to three days, making it a convenient option for gatherings.
Are there any nut-free variations?
Accommodating Allergies
Yes, there are many nut-free variations of it. Simply omit nuts from any recipe, or replace them with seeds like sunflower or pumpkin for a similar texture without the allergens. This ensures everyone can enjoy this delightful cake, worry-free.
How to ensure Ciambella doesn’t dry out?
Keeping It Moist
To prevent it from drying out, ensure it’s properly wrapped or stored in an airtight container after cooling. Additionally, incorporating ingredients like yogurt or buttermilk into the batter can help maintain its moist texture, even days after baking.
Can Ciambella batter be frozen?
Freezing for Convenience
Indeed, Ciambella batter can be frozen, offering the ultimate convenience. Pour the batter into the cake pan, cover it tightly, and freeze. When ready to bake, allow it to thaw in the refrigerator overnight, then bake as directed. This method ensures fresh Ciambella is always just an oven preheat away.
Tips for a perfect Ciambella every time?
Mastering the Art
For a flawless Ciambella, ensure all ingredients are at room temperature before starting. This facilitates better mixing. Don’t overmix the batter to keep the cake light and airy. Lastly, a properly preheated oven is crucial for even baking and optimal rise.
Closing Thoughts on Mastering Ciambella
In wrapping up our culinary journey through the world of Ciambella, it’s clear that this Italian ring cake is more than just a dessert. It’s a symbol of tradition, versatility, and the joy of sharing. From its humble origins to the myriad of flavors and adaptations available today, Ciambella has something to offer every baker and dessert lover.
Embracing Tradition with Innovation
Firstly, embracing the traditional aspects of Ciambella while also exploring innovative variations showcases the dynamic nature of Italian cuisine. Whether you’re sticking to the classic recipe or venturing into gluten-free or vegan territories, the essence of Ciambella—bringing people together—remains unchanged.
The Joy of Baking and Sharing
Moreover, the process of baking Ciambella itself is a delightful experience. Gathering the ingredients, mixing the batter, and watching it transform in the oven is a testament to the magic of baking. Subsequently, sharing the finished cake with family and friends amplifies this joy, making each slice a celebration of community and culinary craft.
Continuing the Culinary Adventure
Lastly, as we conclude this guide, the adventure doesn’t end here. Each Ciambella you bake is an opportunity to refine your skills, experiment with new flavors, and create lasting memories. Therefore, I encourage you to keep exploring, baking, and sharing this wonderful cake.
Print
Ciambella: The Ultimate Guide to Italian Ring Cake
- Total Time: 1 hour
Description
Wake up to the sweet aroma of our Ciambella Breakfast Cake! 🍋🍰 Perfect with your morning coffee or tea.
Ingredients
- 2 cups (250g) all-purpose flour
- 1 ¾ cups (350g) sugar
- ½ cup (120ml) vegetable oil
- 1 cup (245g) plain yogurt
- 3 large eggs
- Zest of 1 lemon
- 2 teaspoons (10ml) vanilla extract
- 2 teaspoons (10g) baking powder
- ½ teaspoon (2.5g) baking soda
- ½ teaspoon (2.5g) salt
- Powdered sugar for dusting
Instructions
- Preheat oven to 350°F (180°C). Grease and flour a 10-inch (25cm) bundt pan.
- In a large bowl, whisk together the flour, sugar, baking powder, baking soda, and salt.
- In another bowl, combine the vegetable oil, plain yogurt, eggs, lemon zest, and vanilla extract. Mix well.
- Add the wet ingredients to the dry ingredients, stirring until just combined. Do not overmix.
- Pour the batter into the prepared bundt pan.
- Bake for 45-50 minutes, or until a toothpick inserted into the center comes out clean.
- Let the cake cool in the pan for 10 minutes, then turn out onto a wire rack to cool completely.
- Dust with powdered sugar before serving.
- Prep Time: 10 minutes
- Cook Time: 50 minutes
Nutrition
- Serving Size: 12 servings
- Calories: 320 kcal